
As an event professional, you are working towards that one day and you want things to go as smoothly as possible. Attendee registration (checking in and checking out your attendees upon arrival and departure) is an important element of your event. It is of great importance that this process is flawless and quick: you want the first impression of your attendees to be positive!
Event check-in = insights
No matter the type of B2B event, it is always interesting to check in (and check out) your attendees. If you know who attended, you can send a survey to collect valuable insights. For example about the quality of the workshop or a keynote speaker, or to find out what can be improved next time. Besides, checking in your visitors enables you to calculate the no-show percentage of your event. More and more organisations nowadays ask for a (small) contribution of the people that did not cancel their registration in the last 24/48 hours.
Event check-in enables personalisation
Checking in your attendees makes it easier to personalise the communication to your contacts. You can differentiate in your messaging: tell your absentees that you missed them - and ask them why they couldn’t attend. This can give you valuable information for future editions. Also, the response rate increases when an email is personalised. Besides all this, you can target your contacts more accurately in the future, when you know which events they attended. All in all, checking in your customers will lead to better results on your event objectives.
Event check-in: perfect for paid events
Although paid events generally have lower no-show rates, checking in your attendees is crucial. After all, you only want to admit people who paid for their entry ticket. There are many types of paid events, eg. conferences, symposia or seminars. Read more about how to use (paid) tickets for your events.
Attendee registration for training events
Checking in and checking out attendees is crucial for training events for which accreditation points are assigned afterwards. Being present or absent determines whether or not the points are granted - so checking in (and checking out!) attendees is very important. You as an event manager don’t want to spend your valuable time on manually keeping track of Excel sheets. Using an appropriate event check-in app enables you to keep the overview.

The Momice registration overview can be filtered on registration status. You can select or export this list for targeted email campaigns.
Use event registration software
If you use event registration software, an e-ticket including QR-code is automatically attached to the registration confirmation. You can easily scan this QR-code with any smartphone to see who is present and who is still expected.
Be well prepared
On the day of the event, it is important that the check-in process goes smoothly. You want to prevent long queues at the entrance: they are the #1 frustration for your attendees. The following 10 tips guarantee a relaxed start of the day.
10 tips for smooth attendee registration
- Tip 1: Limit the number of actions per check-in. Deploy more people or reduce the number of manual actions to speed up the check-in process.
- Tip 2: Test all the steps in the registration process on beforehand to prevent unpleasant surprises. Also calculate the time per individual check-in.
- Tip 3: Make sure your registration desk contains enough scanning points. A formula to calculate the number of required scanning points is included in our white paper ‘Registration’.
- Tip 4: Position the scanning points at the entrance as broadly as possible, so you can check in multiple visitors simultaneously.
- Tip 5: Speed up the process by asking the people in the queue to keep their e-tickets at hand. A professional event check-in apps will enable you to do multiple check-ins at the same time.
- Tip 6: Not all attendees remember to bring their e-tickets. Take these attendees out of the queue and direct them to a host(ess) that can manually add or look up the information on a laptop.
- Tip 7: Make sure you use a proper QR-code scanner. As of September 2018, Momice offers a custom event check-in app.*
- Tip 8: Arrange for a stable internet connection, preferably cable or 4G. Do not simply rely on the location WIFI, as this can become less stable when many people are using it.
- Tip 9: Make sure all scanning smartphones are fully charged and keep chargers handy. For outside events, consider bringing one or more power banks.
- Tip 10: If you use badges, print them before the event. Printing badges on location is expensive and time consuming. If you decide to print badges on-site, do this in a separate area, so the check-in flow does not stagnate.
*Update: As of 10 September 2018, Momice offers a custom Check-in app. Checking in and checking out attendees becomes easier, clearer and safer with this GDPR compliant app, tailor made for Momice users. The app can be downloaded from the Apple App Store for iPhones and Google Play Store for Android devices.
 .
. 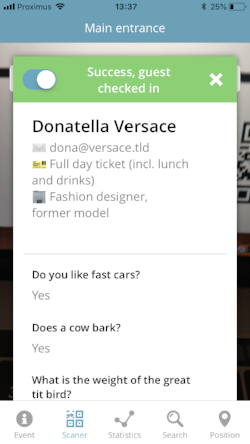
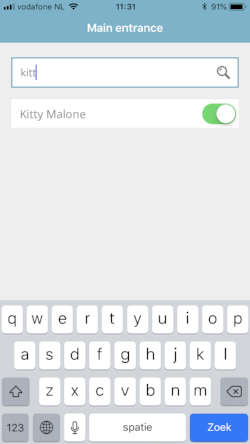
With the Momice Check-in app you can easily scan the QR-code on the e-ticket of your attendee. Quickly look up and check-in your attendee manually.
Conclusion
It is important to know who attended your events: checking in attendees gives you valuable insights. The tips above help you prevent long queues and result in a smooth event check-in process.
In order to streamline your event even more, read more about on-site registration.